Replicating a block-based volume
Before you begin
Before you can replicate a block-based volume, you must first make sure:
- You have installed and configured the Multi System Manager (MSM) and witness service. All replicated systems must be registered to the same MSM.
- Pools with names matching the pools used by the source volume exist on the target system.
- The destination system has enough free capacity to accommodate the replicated volume (and expected growth).
- You have created replication floating IPs on both the source and target systems.
- If you are planning on replicating to an existing application and volume on the target system, the volume must be uninitialized. In other words, the target volume must not have a filesystem, share, or any mapped initiator hosts. For simplicity, StorONE recommends allowing the replication setup to create a matching application and volume name on the target system. This requires that the application and volume do not exist on the target system.
- Although it is not required for replication to work, if you want to be able to access the replicated volume at the same IP address regardless of which system is currently hosting the primary, you should have created and paired floating IPs for the volume. You can create and pair floating IPs at any time, even after replication has been configured.
For best results, StorONE strongly recommends:
- Isolating the replication network infrastructure. If possible, the replication network should be dedicated to StorONE replication traffic, and nothing else.
- Using redundant network connections for replication.
- Ensuring that the maximum latency between replicated systems is 2ms or less when using synchronous replication.
Starting replication
As mentioned in the Before you begin section, you can allow the volume replication mechanism to automatically configure an identical volume on the target system, or you can pre-create the target application and volume. For best results, StorONE strongly recommends allowing the system to automatically configure the target volume.
For automatic configuration, make sure that the target system can accommodate all characteristics of the source volume, including:
* Drive pools with identical names for all volume pools (including any tier pools and metadata pools).
* Enough drives in each pool to accommodate the source volume N+K configuration (data blocks + parity blocks).
* Enough system capacity to replicate the source volume, as well as any near-term expected growth. You can increase the capacity of the source and target pools and volumes independently by adding drives and editing the volume capacity on each system.
If you require different volume configurations on the source and target systems (such as different pool names or N+K settings), you must pre-create the target application and volume with the required settings, but you must not initialize the volume. In the StorONE system, a volume is initialized when you either add a filesystem (for NAS and object store volumes) or map the volume to a host (for block volumes).
If you pre-create a volume on the target system, make sure that the capacity and sector size settings are identical to the source volume.
To replicate a block-based volume:
Web UI
In the admin web interface, go to Replication ![]() . Click the Start button, and fill in the fields:
. Click the Start button, and fill in the fields:
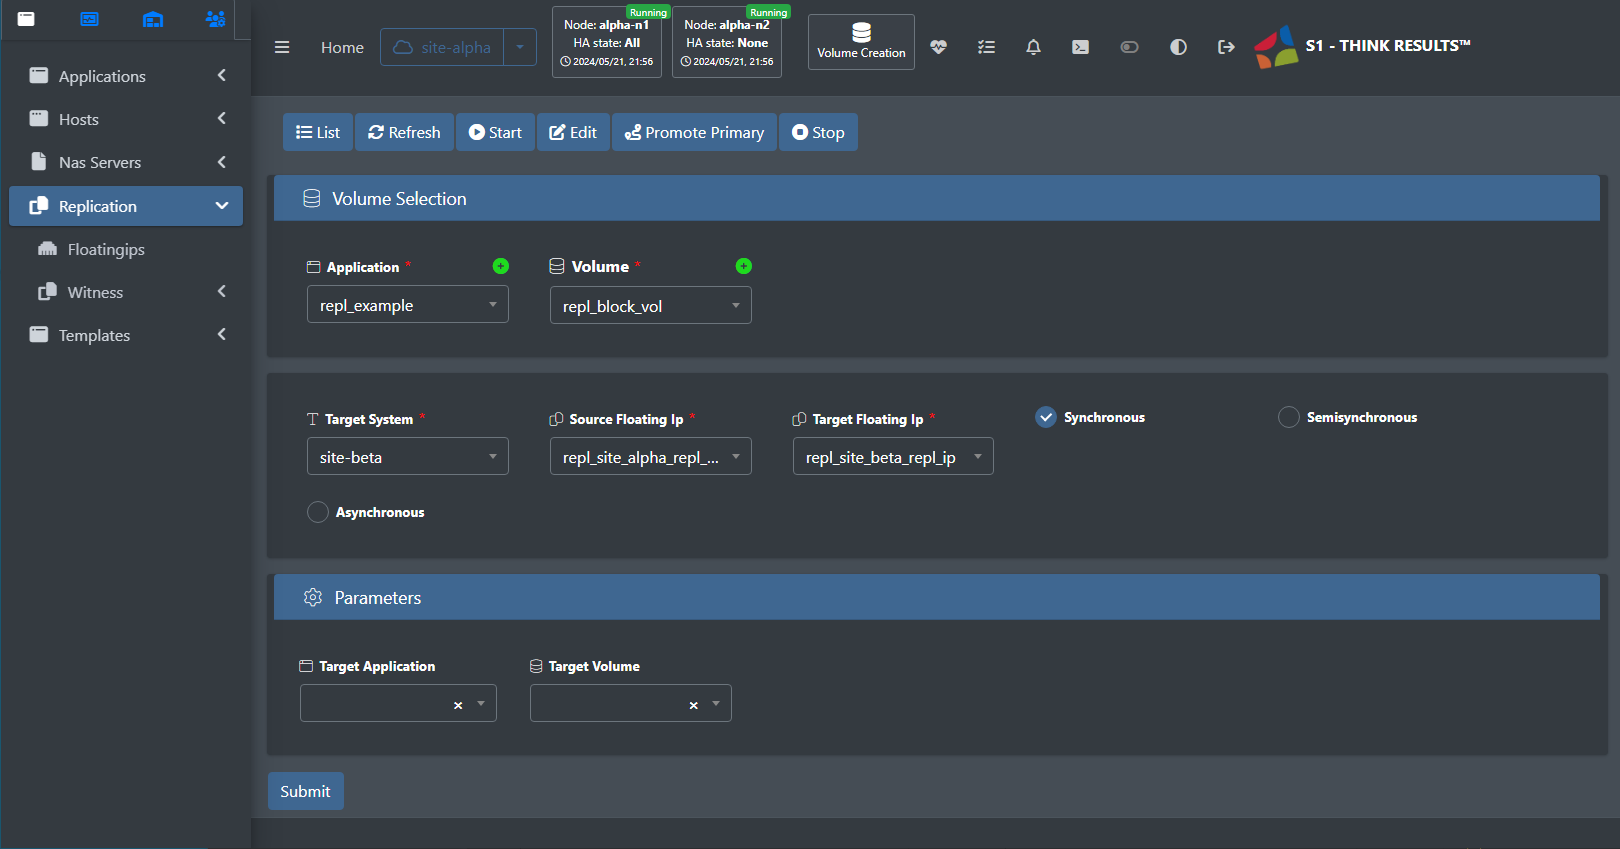
Volume Selection
Application: Select the application containing the volume you want to replicate.
Volume: Select the volume that you want to replicate.
Target System: Select the target system that you want to replicate to.
Source Floating Ip: Select the replication floating IP entity that you want to use for replication. Most deployments use just one replication floating IP entity per system. In a highly available (HA) deployment, the replication floating IP entity defines two IP addresses: one per controller node. However, this uses a single named configuration entity, so there is only one entry to select in the drop-down menu.
Target Floating Ip: Select the target replication floating IP entity. As with the source floating IP, in most systems, there is only one target floating IP configuration entity to select that encompasses both floating IPs in an HA system.
Synchronous, Semisynchronous, or Asynchronous: Select the replication mode you want to use. For more information on these modes, see Replication overview.
Parameters
In the Parameters section, StorONE recommends leaving the fields empty to allow the replication setup to create a matching application and volume on the target system, with identical erasure coding, tiering, and metadata configurations. If you need to pre-create the application and volume (for example, to use different pool names or erasure coding (N+K) settings, you can do so, but StorONE recommends against it.
Target Application: If you pre-created an application and volume on the target system, select the application. If you do not see the application or volume, make sure that the source and target system are registered to the same Multi System Manager as described in the Before you begin section.
Target Volume: If you selected an existing application, the Target Volume field appears, and you can select an existing volume from that application. The volume must be uninitialized, meaning that it cannot have a filesystem, object store, or have been mapped to an initiator host.
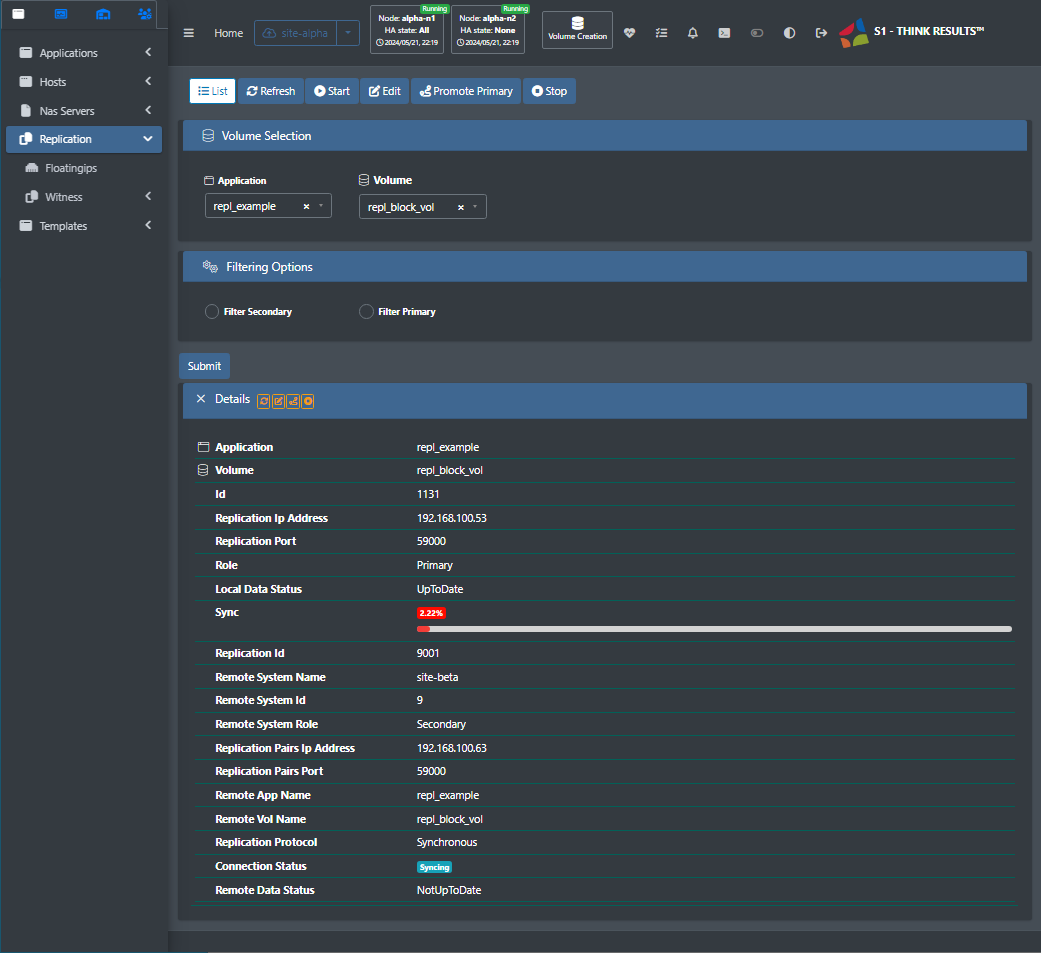
After completing all fields, click Submit to start replication. You can view the progress by clicking the List button on the Replication page:
Pairing hosts
Web UI
Block replication supports SPC3 persistent reservations where the locks are replicated between the nodes in a replicated system. To activate these persistent reservations, you must create an initiator host on both systems, and pair them together. This allows an initiator host that has a persistent reservation to continue writing to the volume after a replication transition event.
If you do not define a host on both systems in a replicated system and pair them together, that host is blocked from writing to the volume after a replication transition occurs and the secondary system becomes the primary.
Before you can pair a host, you must first create the host on both sides. For more information, see Managing initiator hosts.
To pair a host, in the Application Volumes menu, go to Hosts ![]() , and click the Pair button:
, and click the Pair button:
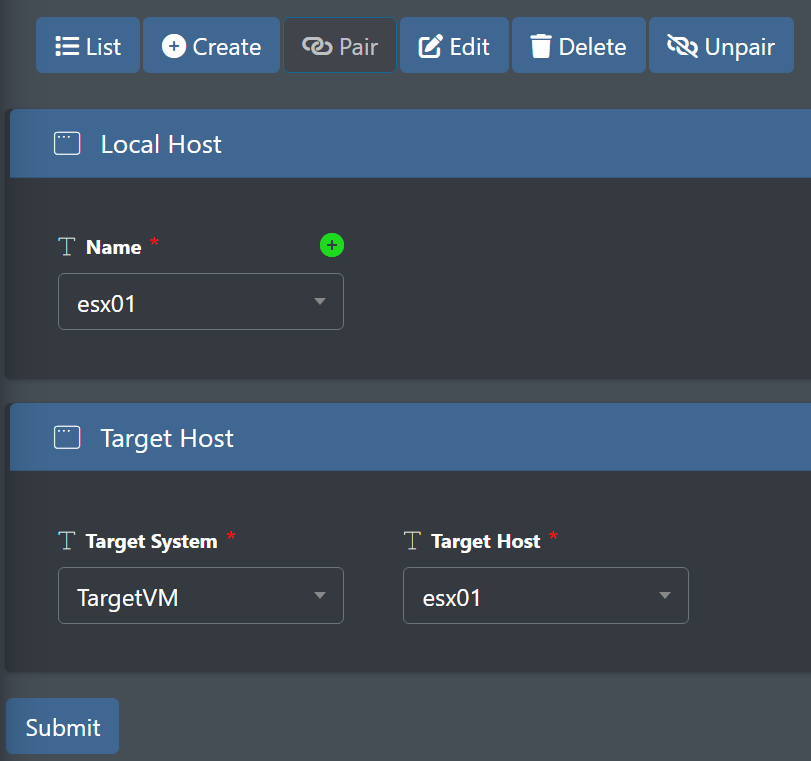
Select the initiator Name on the local host, the Target System containing the host you want to pair with, and the matching Target Host on the replica system.
Click Submit to create the pair.
Configuring automatic transition
Automatic replication transition adds another layer of redundancy and application continuity for client connections.
This feature transitions the ownership of a volume to a replica automatically if the system hosting the primary volume fails.
This functionality requires a witness service, which runs on the Multi System Manager (MSM) service. For more information, see Multi System Manager and Configuring the witness service.
After configuring the Witness service using the Replication 🡪 Witness 🡪 Settings dialogue, all the replicated volumes will be configured for automatic transition if the primary source replication system fails.
No comments to display
No comments to display