Configuring Windows Server iSCSI initiator and the StorONE Array
Summary
Using Powershell to connect a windows server to the StorONE array via iSCSI.
Requirements
StorOne array enabled for iSCSI
Windows server with powershell
Windows server with at least one NIC configured for an iSCSI data network.
Steps
- install and enable Multipath software (MPIO) for Windows server
- Verify and enable windows iSCSI initiator service
- Configure StorOne array for iSCSI
- Configure MS iSCSI Initiator to connect to the StorONE array
- iSCSI LUN discovery and LUN connection
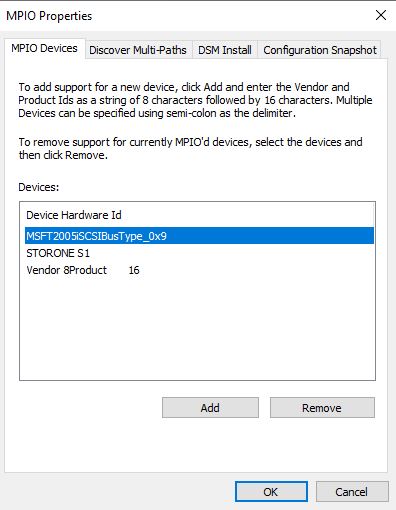
Install Multipathing (MPIO) for Windows server
To verify Multipathing (MPIO) is installed for Windows server:
To install and configure Multipathing for Windows server
NOTE: Reboot of the server may be required to complete MPIO installation
MPIO will be configured later on in the guide, we just need to have it installed before proceeding.
Verifying and enabling iSCSI service for Windows Server
Start Powershell as an administrator
From Powershell get the Microsoft iSCSI initiator service status:
Get-Service -Name MSiSCSIIf the service is disabled, it can be started:
Start-Service -Name MSiSCSIThe iSCSI service should be set to automatically start as data LUNS are dependent on the iSCSI initiator connecting to the array.
Set-Service -Name MSiSCSI -StartupType AutomaticIf the service was already running, we should check for any existing iSCSI configuration in use.
To check for existing iSCSI configured targets:
Get-IscsiTargetIf iSCSI is already in use on this server then there will be configured targets. If there are no configured targets, then iSCIS is not in use on this host.
To get the host IQN for creating a LUN map on the array:
Configuring the StorOne array for iSCSI
From the CLI use the following commands to verify and configure iSCSI data service for the array.
To verify iSCSI is configured on the array:
resources network iscsi listThis will display the IPs for which iSCSI data service is configured. If there is nothing returned when running the command, then iSCSI is not configured for the array
To configure iSCSI traffic for data interface (NON Floating IP Addresses) IP address:
resources network iscsi add <node1-data-ip> <node2-data-ip>
NOTE: Static IP addresses should be used for iSCSI traffic. iSCSI traffic is not recommended for tagged VLANs, or floating IPs
To create a host entry for iSCSI access on the array:
hosts create <host name> --ip <dns-host-ip> --iqn <host-iqn>When adding a host to the array, the iSCSI initiator addresses should not be used when adding the host to the array, the ip address used should resolve in DNS.
Example:
hosts create win-host1 --ip 192.168.50.96 --iqn iqn.1991-05.com.microsoft:win-tim3kbf0a35To create a host lun map on the array:
applications mappings add --application <application-name> --volumes <volume-name> --lunIds <Lun-ID --hosts <host-name>Example:
applications mappings add --application iscsi-test --volumes iscsi-lun-[1-2] --lunIds [1-2] --hosts win-host1To get the StorONE array iscsi IP addresses:
resources network iscsi listTo get the array node target IQNs:
nodes list --gatewayConfigure MS iSCSI Initiator to connect to the StorONE array
Adding the StorONE array iSCSI addresses as MS iSCSI targets portals:
NOTE: the field -InitiatorInstanceName is the same for all windows hosts however this is required to be specified otherwise the “default” connection will be used which can cause issues
New-IscsiTargetPortal -TargetPortalAddress "<array-node1-iscsi-address>" -InitiatorInstanceName “ROOT\ISCSIPRT\0000_0” -InitiatorPortalAddress <host-iscsi-initiator-address1>If the array is High availability, then both nodes will need to be added as target portals
Example:
New-IscsiTargetPortal -TargetPortalAddress "10.10.50.90" -InitiatorInstanceName "ROOT\ISCSIPRT\0000_0" -InitiatorPortalAddress "10.10.50.239"

New-IscsiTargetPortal -TargetPortalAddress "10.10.50.91" -InitiatorInstanceName "ROOT\ISCSIPRT\0000_0" -InitiatorPortalAddress "10.10.50.249"
To verify the iscsi targets added to the Windows server:
Get-IscsiTargetTo connect to the iSCSI targets after adding the discovery portals. The command below will do all of the following:
Connect to target, enable multipathing, add the target as a persistent target to be connected on every start or reboot of the host server. This does not add the drive letter as a favorite target, this will be addressed later on.
Connect-IscsiTarget -InitiatorPortalAddress "host-iscsi-initiator-address" -TargetPortalAddress "array-iscsi-node-address" -InitiatorInstanceName "ROOT\ISCSIPRT\0000_0" -NodeAddress "array-node-iqn" -IsMultipathEnabled $true -IsPersistent $trueExample:
Host IP 1: 10.10.50.239
Host IP 2: 10.10.50.239
Array IP Node 1: 10.10.50.90
Array IP Node 2: 10.10.50.91
Connect-IscsiTarget -InitiatorPortalAddress "10.10.50.239" -TargetPortalAddress "10.10.50.90"-InitiatorInstanceName "ROOT\ISCSIPRT\0000_0" -NodeAddress "iqn.2012-01.com.storone:5882e5a-0002-0001" -IsMultipathEnabled $true -IsPersistent $trueTo create a full mesh connection, we will need to issue three more commands to complete our connections
Connect-IscsiTarget -InitiatorPortalAddress "10.10.50.239" -TargetPortalAddress "10.10.50.91"-InitiatorInstanceName "ROOT\ISCSIPRT\0000_0" -NodeAddress "iqn.2012-01.com.storone:5882e5a-0002-0002" -IsMultipathEnabled $true -IsPersistent $true

Connect-IscsiTarget -InitiatorPortalAddress "10.10.50.249" -TargetPortalAddress "10.10.50.90"-InitiatorInstanceName "ROOT\ISCSIPRT\0000_0" -NodeAddress "iqn.2012-01.com.storone:5882e5a-0002-0001" -IsMultipathEnabled $true -IsPersistent $true

Connect-IscsiTarget -InitiatorPortalAddress "10.10.50.249" -TargetPortalAddress "10.10.50.91"-InitiatorInstanceName "ROOT\ISCSIPRT\0000_0" -NodeAddress "iqn.2012-01.com.storone:5882e5a-0002-0002" -IsMultipathEnabled $true -IsPersistent $true
Now that the connections are completed, MPIO can now be configured.
Configure MPIO with iSCSI devices connected
To enable MPIO for iSCSI:
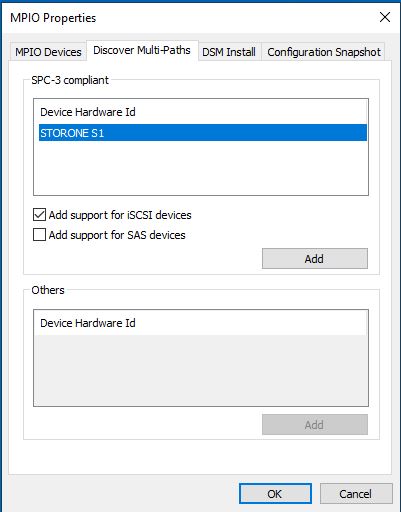
To verify MPIO has been enabled for iSCSI devices
iSCSI connections are now completed for our host.
All LUNs masked to the host IQNs on the array will be visible as a unique disk under Computer Management.
Each disk will need to be formatted, and given drive letters or mount points. Only one device should be visible per LUN. If multiple devices appear to be related to the same disk, then the MPIO software is not installed or correctly configured.
With the volumes formatted and assigned drive letters or mount points for use on the host. To ensure that the same mount points or drive letters are consistently used for each host boot:
Adding newLUNs only requires creation and LUN masking on the array a refresh from the iSCSI initiator app, disk initialization and formatting, assigning drive letters or mount points and to auto configure them as needed to survive a reboot of the host.
No comments to display
No comments to display