Volume Shadow Copy Service (VSS) snapshots
Application consistent snapshots can be taken by the StorONE array for Microsoft hos application servers. The application consistent snapshots are taken using Microsoft Volume Shadow Copy Service (VSS). Microsoft VSS enables theapplication-consistent applicationsnapshots server to temporarily quiesce IO for designated applicationon volumes and specific applications used by Microsoft Windows. To enable VSS snapshots with the StorONE system, the StorONE VSS module must be installed on all Windows servershosts or cluster members that use the volume.
StorONEIn applicationorder consistentfor snapshotMicrosoft requirements:VSS snapshots to be enabled:
- The StorONE volume must be block-based and directly mapped and formatted from the host (not through a hypervisor), or a virtual disk mounted as a drive letter on the
Microsofthost.hostVolumesapplicationusedserverasmustvirtual disks can beseen as a "blockdevice", and not a network attached drive. This is possible in one of two ways:directly connecting the StorONE array to your application host via iSCSIorFibrefilesystem-basedChannelvolumes (NFS). Network mapped shares cannot be used forapplicationMicrosoftand log volumesDirectly connecting a hypervisor via iSCSI or Fibre Channel, and then presenting the volumes to the host application server as a block devices. Block devices which are back by file based (NFS) or SMB shares are not supported for Application consistentVSS snapshots with StorONE at this time.
- The Microsoft application must be VSS capable (Microsoft SQL, Exchange, Sharepoint, and so on).
- The StorONE VSS application must be installed on each Microsoft host where application consistent snapshots are required. For Microsoft clusters, the
StorONEVSS application must be installed on each individual cluster member. Connectivity
Installing the StorONE arrayVSS managementplugin IPon addressesMicrosoft andWindows
Pre-requisites
You must install the Application host server(s) via TCP port 18222
The latest Microsoft Visual C++ Redistributable Version package before installing the StorONE VSS plugin. It can be downloaded from Microsoft.
Download the relevant version for your Windows platform (x86 or x64).
If the StorONE VSS module was installed before installing the Microsoft Visual C++ Redistributable Version, remove the module, install the Microsoft Visual C++ Redistributable Version, and then reinstall the StorONE VSS module.
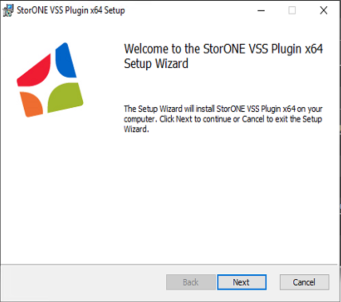
Installing the StorONE VSS plugin on Microsoft Windows
Downloading the StorONE VSS module
Download the latest VSS installer .MSI file from the StorONE landing page. In a browser, go to the DNS name or IP address of either of the StorONE controller nodes, and click the VSS Installer link.
Installing the StorONE VSS module
After the download completes, run the installer. Make sure to download and run it on all Windows machines (physical or virtual) that use the StorONE volume that you want to enable VSS snapshots on.
After the installation finishes, two services are added to the Windows host: S1VssHardwareProvider and S1VssService:

NOTE:The whenhardware verifyingprovider the installation of the VSS services, the S1VssHardwareProviderservice should be set forto Manualmanual startupstart, type. If the startup type is Automaticas it needsonly toruns bewhen changedMicrosoft toVSS Manual.snapshots are being taken.
When ana applicationMicrosoft consistentVSS snapshot is initiated by the StorONE system, the arrayappliance contacts the Microsoft VSS provider on the hostWindows applicationmachines server viaon TCP port 18222. In order for application consistent snapshots to work properly, make sure that this port is availableopen for requests from the management IP on both StorONE controller nodes. Application consistentVSS snapshots can be scheduled or manually initiated via the StorONE UI.
StorONE system configuration
Step 1: Create Application and log volumes in StorONE
Configure volumes and consistency groups in StorONE. It is recommended to create a specific application to contain the applicaiton and log volumes for each host applicaiton server. In cases where the application server is a cluster, only one StorONE application and set of volumes need to be created for the cluster.
(fill in steps)
We may want to recommend log volumes be on SSD becaise they are small and this will make it easier to snapshot from a performance perspective. log volumes are usually 100G or less, and can be as little as 10G
Step 2: Mask volumes to host or Hypervisor
Create host groups and mask LUNs as needed
(fill in steps)
In the StorONE admin web interface, there are two steps required to enable Microsoft VSS snapshots:
- Enable VSS for the required volume
- Configure a snapshot schedule
Step 3:1: Enable VSS
In the consistencyGUI, Group
needgo to changeApplications instructions🡪 Snapshots, and photothen to a consistency group and slightly alterclick the textVSS for this
button.
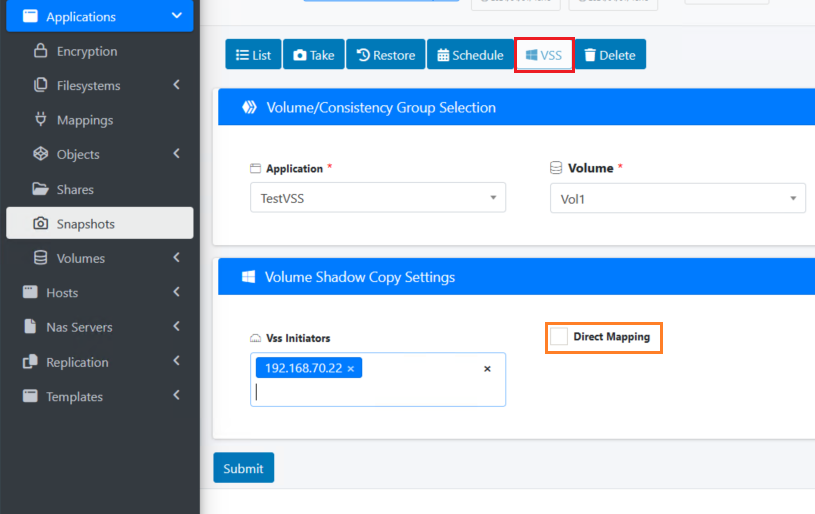
Specify the application and volume that you want to enable VSS snapshots for, and add the IP addresses of all Windows machines using the volume.
If the volume is a block volume (iSCSI or Fibre Channel) directly mapped to the Windows hosts, make sure to check the Direct Mapping checkbox.
If the volume is beingan hostedNFS throughfilesystem volume or a Hypervisorblock presentingvolume used as a datastore hosting virtual disks for the Windows hosts, do not check the Direct Mapping checkbox.
Step 2: Configure snapshot schedule
On the Applications 🡪 Snapshots page, you can manually take a one-time snapshot by clicking the Take ![]() button, or by clicking Schedule
button, or by clicking Schedule ![]() to schedule recurring snapshots. In both cases, check the Enable Vss box.
to schedule recurring snapshots. In both cases, check the Enable Vss box.
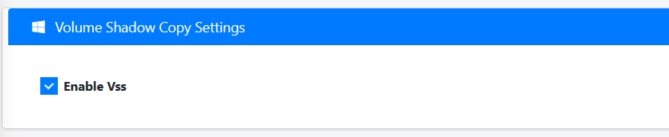
When a VSS-enabled snapshot is initiated, the StorONE system will communicate with the VSS services on the Windows machines to coordinate an application-consistent snapshot.
Using the CLI
To manually take a Microsoft Application consistent snapshot using the CLI, use the --vss argument:

Troubleshooting
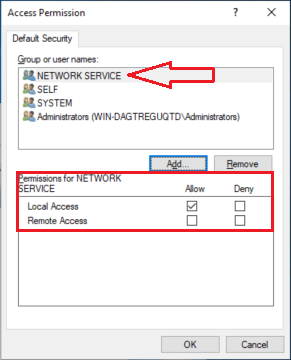
In some cases, the VSS snapshotsbackup fails with error 8194: Access Denied. This is caused when the Windows NETWORK SERVICE predefined local user does not have sufficient access permissions.
To fix this issue, add the relevant permissions:
- Open the Windows Start Menu, then search for and run the dcomcnfg tool.
- Expand the path Console Root 🡪 Component Services 🡪 Computers.
- Right click on My Computer, then select Properties.
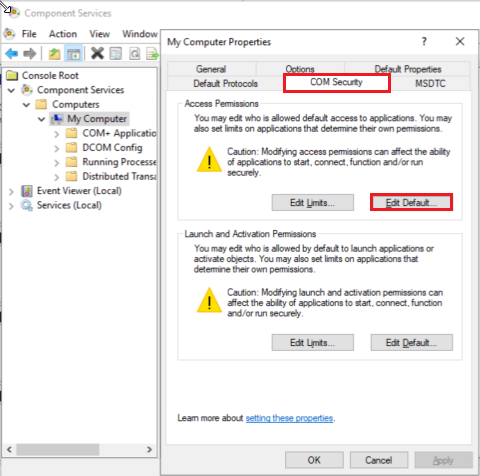
- In the My Computer Properties dialog box, select the COM Security tab
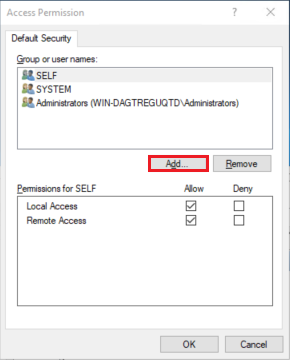
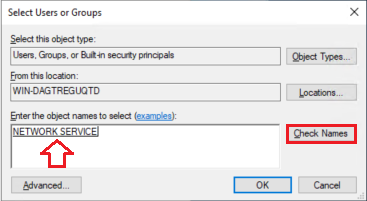
- In the Access Permission dialog box, click Add and enter NETWORK SERVICE.
- To make sure the spelling is correct, click the Check Names button.
- After adding NETWORK SERVICE make sure the Local Access permission is allowed.

- Click OK to save the configuration.